Working with Images
When adding an image to your webpage, it's important to make sure that you are allowed to use the image and that it's high quality and an appropriate size.
Jump to:
Finding an image
The first step in adding an image to your webpage is finding an appropriate image that you can legally use. If the image is part of the Kenyon communications collection, then you can. If you have created the image yourself — it's a photograph that you took or a logo that you designed or a picture that you drew — then you can.
If you find an image as a result of a general internet search, then you probably can't use it without permission from its creator. It is safest to assume that a randomly discovered image is not okay to post on your webpage.
The College has received notice to pay after-the-fact when images have been used inappropriately (often several hundreds of dollars).
If you need an image of Kenyon (a building or a student activity, for example), you can contact the Office of Communications to request an image from their collection.
If you need a more general image (an object or famous landmark, for example), there are several websites that collect public domain images and provide information about how you can use them:
Wikimedia Commons
Pixabay
Public Domain Archive
Everystockphoto
Unsplash
If you need a very specific, high-quality image (of a celebrity, for example), you can usually find one to purchase through a website like AP Images. If you do need to purchase an image, please contact the communications web team for assistance determining the correct license and image size. Some licenses only allow you to use an image for a certain period of time or in a certain medium (in print but not online, for example).
Attribution
Some images require attribution, a line stating the name of the image, who created or owns it, a link to the website where the original is posted and a link to the relevant license. For example:
"[Name of image and link to original]," by [image owner], is licensed under [link to license].
Many images that are free to download still require attribution — please double-check whether it is necessary. If you are unable to add text to attribute the photo in the space where you plan to use it, please find a different image to use.
Educational/Classroom Use
Posting images on a publicly accessible website is different from using them in a classroom/educational setting. Limited educational use of images in a class or meeting is generally okay — for example, if a faculty member includes an image of a piece of art in a PowerPoint presentation that will only be viewed in a classroom.
Please note: If an educational event is taking place on campus, like a guest speaker in an academic department, and that event has a poster, you should not upload an image of that poster to the Kenyon website or to the Kenyon calendar unless you can confirm that any images in the poster are free to use and correctly attributed. Please use an image of the event location, a head shot provided by the guest speaker or another image that you can confirm is okay instead.
Image size and quality
It's important that your image size and quality match up: if your original image is too big, it will take a longer time to load on the screen; if it's too small and you "blow up" or stretch it to make it appear larger on the page, it will appear blurry or pixelated. Here's an example of a low quality image that's small, 100 x 100 pixels, but has been blown up to 250 x 250 pixels:

Some features of the website (like content blocks) will provide a minimum image pixel size. If your image is larger than the minimum when you upload it, you will have an opportunity to crop it before saving or publishing the page. Smaller images will not upload.

Once you've found an appropriate image, the next step is uploading it to a webpage.
Uploading an image
How you upload an image depends on whether your image is included in the page template, a content block or callout, or in the page's content.
Images in Page Templates
Some page templates, including the default template "Content w/ Features" and the template "Content w/ Media Gallery," allow you to upload feature images that headline your page. The following are examples of images within a page template:
Content w/ Features with multiple images
Content w/ Features with single image
Content w/ Media Gallery with multiple images
Content w/ Media Gallery with single image
To add an image to the page template, you will need to login to the website, navigate to the relevant page and select "Edit in BigTree" in the BigTree navigation bar. If you are creating a new page, please visit the Creating a New Page section of this guide.
Under "Features" or "Media Gallery," depending on your page template, you can then click "Upload" and find the image on your computer. Open the image and its name should appear in the upload field.

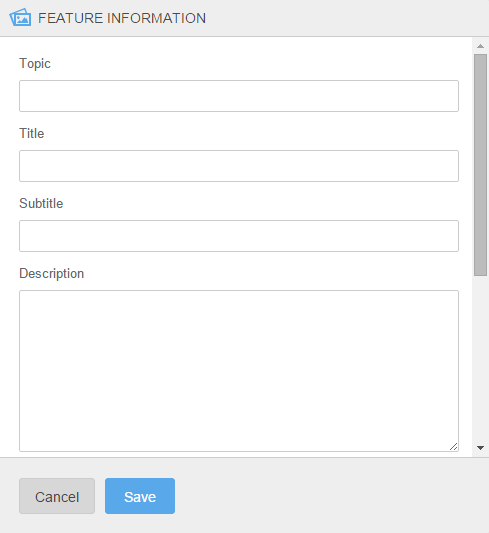
Click "Add Photo" and fill in the relevant information for the image.

"Save and Preview" your page to make sure that your image and accompanying information are displaying correctly. If your image is larger than the display allows, you will be given an opportunity to crop it before the page is previewed or published. Images that are too small will not upload and you will have to go back and upload a larger image (and re-enter the feature information).
Images in Content Blocks and Callouts
Adding images to specific content blocks or callouts is similar to adding them as a feature, except that you first select the type of content block and then add the image(s) alongside the other information fields. For more information, see the Working with Content Blocks section of this guide.
Images in Page Content
Generally images should be added to your page in the feature area of the page template or as part of a content block, but occasionally it's necessary to upload an image directly into your main page content.
Step 1. Ensure that your image is high quality but not too large.
Even if you limit the dimensions of your image so that it fits on the page, a large image will still take a long time to load on the screen for page viewers. If you need help adjusting the size of your image, please contact Emily Lindo.
Step 2: Log in to BigTree and click on the "Files" menu item.

Step 3: Navigate to the relevant folder.
"Administrative Offices" > "Advancement," for example, or "Academics" > "Classics."
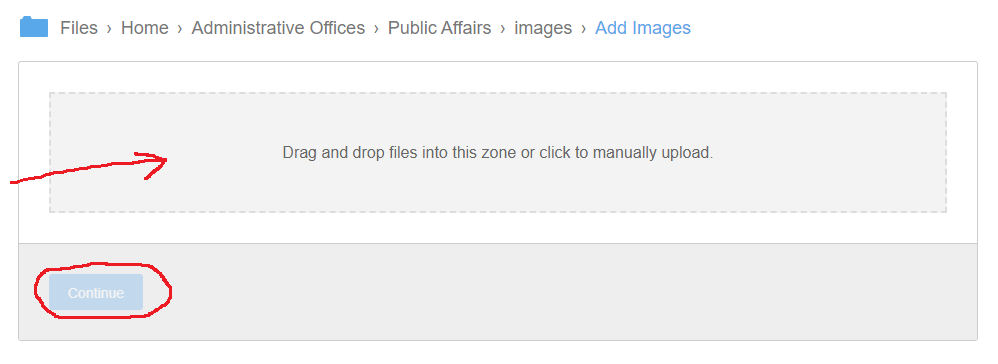
Step 4: Click "Add Images."

Step 5: Upload your image (or images).
Drag and drop the image from your computer, or click in the grey zone to manually upload the image. Click "Continue."

Step 6: Click through the image cropping options.
You will be presented with several automatic crops, depending on the size of your image. These do not matter — you can keep clicking "Crop Image" until you have gone through them all.
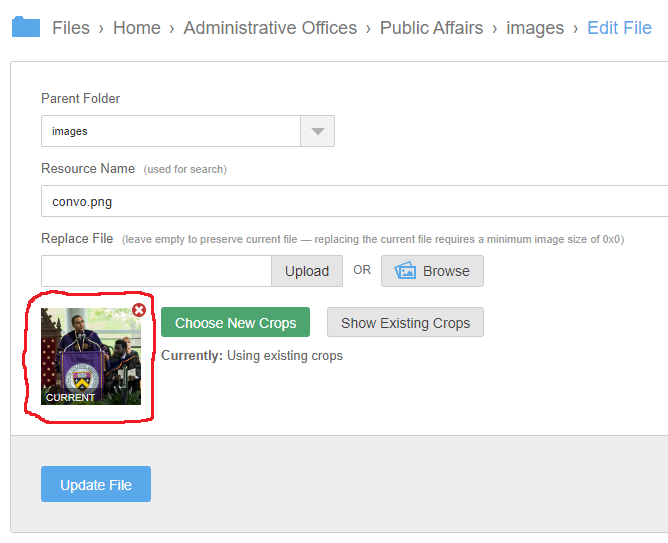
Step 7: You will see a summary screen for your uploaded image.
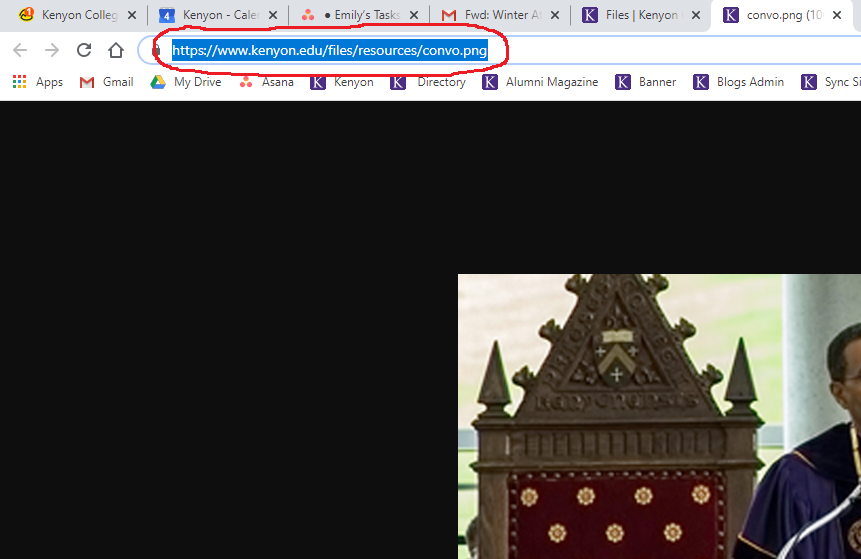
If you just need the source link for your image, left-click on the image thumbnail, which will open the image in another browser tab. Note: Do not right-click on the image thumbnail and select "open image in new tab" — this will only open a thumbnail-sized version of the image.

You can now copy the image source link from your browser.

If you need to add the image to a BigTree webpage in the page content area, continue to follow the instructions below.
Step 8: Navigate to "Edit in BigTree" for your webpage.
In "Edit in BigTree" for the page where you'd like to add the image, click the image button in the Page Content editing box.

Step 9: Click the icon (shown below) to access the website's storage folders.

Note: If you copied your image's source link as described in Step 7, you can just paste that link into the "Source" field and then jump to Step 12.
Step 10: Navigate to your folder.
This will be the same process that you took in Step 3 ("Administrative Offices" > "Advancement," etc.).
Step 11: Select the image that you uploaded in Step 5.
The image that you uploaded in Step 5 should now be visible in your folder. Select your image and click the blue "Use Selected Item" button at the bottom of the window. You'll then see options to choose an image size or one of your crops. It's usually best to select "original" unless you have uploaded a much larger size than you would like displayed on your webpage (several hundred pixels larger, for example).
Step 12: Fill out the remaining fields for your image.
Returning to the "Insert/Edit Image" window (shown under Step 3), you can give your image a brief description, a title and tweak the dimensions if necessary. Please note that the "Image Description" field is mandatory to ensure that your content is accessible.
By default, the image will align to the left without wrapping any text. If you select a specific alignment from the "Class" drop-down menu, the image will align and wrap text around it.
Step 13: Save and Preview to make sure that your image is loading correctly on the page.
Please get in touch with Emily Lindo in the Office of Communications with any questions or concerns.